Let’s dive right into today’s hairstyle.
This is something I kind of created on my own, so there’s no real name for it. I just like the look and enjoyed doing my own little touches to it. 🙂
Step 1: Curl Your Hair!
Just like we always do, begin your hairstyle by curling your hair. If you would like a step-by-step tutorial, click here — it’s my first hairstyling post where I give a step-by-step tutorial of how I curl hair. 🙂 Make sure you always use a heat protector (I recommend the Not Your Mother’s Beat the Heat Thermal Styling Spray) on your hair before beginning to curl — don’t want to damage your hair!
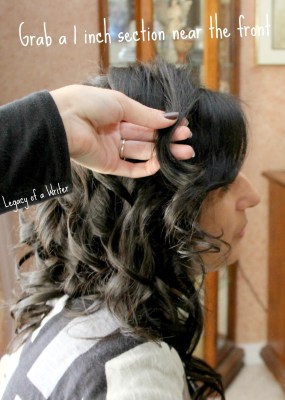
Step 2: Take a Section at the front and Braid it
Take a 1 inch section near the front of your head (I do on the right side, but if you prefer it on your left, feel free to do so). If you have bangs, or like having hair frame your face, leave them out.
Begin french braiding your hair, only incorporating hair within that 1 inch section, and work your way down toward your ear. Keep your braid loose — it gives the hairstyle a very elegant look. If you have trouble with flyaways, use a paste to smooth them down.
Once you reach right above your ear, finish off with a regular braid and secure it with a small elastic band.
Step 3: Give Yourself a Bump at Your Crown
If you like to have a bit of volume in your crown, tease the hair right at your crown just a little bit. Or if you like a lot of volume, go to town with the teasing. 🙂 Basically tease it however much you like. 🙂
Step 4: Twist Hair at the Crown and Pin
Lightly smooth over the tease so you get a very smooth finish. Then gather the hair at the back of your head, right below the crown of your head, and twist it once or twice. Just to help your bump stay up and give your hairstyle visual appeal. 🙂 Once you like how the hairstyle looks, pin in place. I used two pins, crisscrossing them so that they were secure. Feel free to use as many as you like, but if possible keep that hidden. Then it looks like your hair is magically staying in place by itself 😉
Step 5: Pin the Braid Back Against the Twist
If you left your bangs out, twist them lightly around the braid you made on the right side. Play around with it until you like how it looks.
Once you like how it looks, pin the braid against the twist you made in the back of your head.
Step 6: Pin the Hair on the Left Side Back
Now take the hair on your left side, near your hairline, and twist it back loosely before pinning it against the twist right below the crown of your head. Make sure the hairstyle is secure and add any pins to areas that feel loose or insecure.
Step 7: Accessorize!
I always like to add something to a hairstyle, so of course I added a Lilla Rose clip that has beautiful dangles that totally completes this elegant curly updo.
All done!
That’s it! All there is to this hairstyle — it’s really quick and easy, but looks rather complex. I was thrilled to see how well this turned out, and plan to do it to myself something in the very near future. 😀
Don’t Forget! The giveaway NuMe is sponsoring on From My Vanity is still going on! There’s still time to get in your entries for a chance to win a Curl Jam Set.
Click this link to find out how to enter!
Question for My Readers: How much time do you usually get to do your hair when you’re going to a special event? 15 minutes? An hour? 🙂


